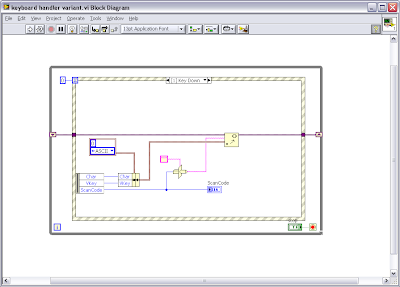
The solution involved using an event structure and capturing "Key Down" and "Key Up" events, then executing the required functionality. This blog will only be looking at how to handle the key presses. If you only want the button to respond to Key Down events your job is already done you just need to program the required functionality. The "Key Down" event will tell you the following information:
- Char - the hex value for the ascii character
- Vkey - ascii or special function such as enter or F7
- ScanCode - a unique number defining each key on the keyboard
Even having mappings for * and # are fairly simple since the hex values differ to the values for 8 and 3, however they share the same physical key on the keyboard so the ScanCode is the same.
Of course the device keypad had different functionality for pressing and releasing a key. The "Key Up" event does not provide you with the same information as the "Key Down" event, unfortunately the only similar piece of information provided by the "Key Up" event is the ScanCode.
The device also has the ability to hold down multiple keys at once. In order to provide this functionality I buffered all "Key Down" event information using the set variant function. Char and Vkey were combined in a cluster as variant data named with the ScanCode typecast as a string. Then when the "Key Up" event provides a ScanCode it is typecast as a string and pumped into the get variant structure to find the Char released and perform the key release function required (This is important because * and 8 have the same ScanCode so I need to know which one to release based on the Char value generated by "Key Down"). You could use any type of buffer you like, to store the "Key Down" data, I just chose variants because retrieving variant information is order log(n) rather than n for a linear search (Darren's Weekly Nugget 10/09/2006), though probably not significant when considering we have a 10 key/finger limitation.


