Thursday, November 12, 2009

Binding Keys to Buttons

One project I worked on required a keyboard handler. Basically a handheld unit was being simulated on the computer and we wanted keyboard shortcuts for all the keys that could be pressed. The only problem with LabVIEW is that buttons on the front panel can only have function keys bound to toggle them.

The solution involved using an event structure and capturing "Key Down" and "Key Up" events, then executing the required functionality. This blog will only be looking at how to handle the key presses. If you only want the button to respond to Key Down events your job is already done you just need to program the required functionality. The "Key Down" event will tell you the following information:

  • Char - the hex value for the ascii character
  • Vkey - ascii or special function such as enter or F7
  • ScanCode - a unique number defining each key on the keyboard

Even having mappings for * and # are fairly simple since the hex values differ to the values for 8 and 3, however they share the same physical key on the keyboard so the ScanCode is the same.

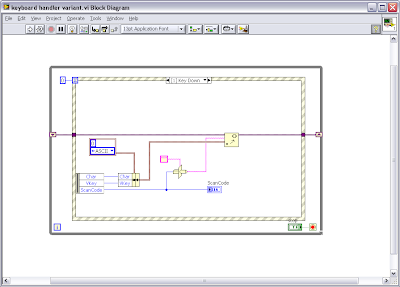
Of course the device keypad had different functionality for pressing and releasing a key. The "Key Up" event does not provide you with the same information as the "Key Down" event, unfortunately the only similar piece of information provided by the "Key Up" event is the ScanCode.

The device also has the ability to hold down multiple keys at once. In order to provide this functionality I buffered all "Key Down" event information using the set variant function. Char and Vkey were combined in a cluster as variant data named with the ScanCode typecast as a string. Then when the "Key Up" event provides a ScanCode it is typecast as a string and pumped into the get variant structure to find the Char released and perform the key release function required (This is important because * and 8 have the same ScanCode so I need to know which one to release based on the Char value generated by "Key Down"). You could use any type of buffer you like, to store the "Key Down" data, I just chose variants because retrieving variant information is order log(n) rather than n for a linear search (Darren's Weekly Nugget 10/09/2006), though probably not significant when considering we have a 10 key/finger limitation.

Monday, November 2, 2009

Custom Controls

Custom buttons in a user interface can make the interface more appealing and easier to navigate. They generally don't require much effort as long as you have reasonable image editing software.

First pick the image you wish to use for the button (This one is courtesy of the gnome user interface and comes under the GNU license be careful with licensing) and ensure it is the required size. This will be the off state image.
Make sure the background is set to be transparent, then save the image as a PNG.
Next copy the image and edit the copy, Create a new layer identical to the bottom layer directly over the top. Fill the top layer foreground with an on/off colour and then blend the images together.
This image will be the on state for the button.
In LabVIEW drop a classic square flat button and right click advanced customize.
In the control front panel click on the spanner to change it to tweezers, then right click on the image import from file and choose your off state image.
Right click the control and select copy the to clipboard.
Right click the control select picture item then the third picture, right click and select import from clipboard. The image is now complete in the off state.

Repeat the process for picture item 2 and 4 with the on state image.

Click the tweezers to switch back to control mode and the custom button is finished.

Monday, October 19, 2009

ni.com/community

I've recently come across a few features on the NI website, that can all be found at ni.com/community. If you look at the right-hand side of the community webpage, there are a list of really useful links which I’ll summarise here:

1) Blogs
Here you can browse through all the blogs hosted on the NI webpage. Our LabVIEW Downunder blog has a place mark here, we’re just yet to figure out the best way of linking it to our google blog.

2) LabVIEW Ideas
This is like a suggestion box for LabVIEW. So, every time you think “wouldn’t it be great if LabVIEW could......”, just go to the LabVIEW ideas and type it in! People who like your idea will give it “kudos”, and those ideas with the most kudos end up as a high priority enhancements for the NI R&D Team. Examples that have made it into LV already are the ability to delete an object from wires and auto-reconnect the wires, and the new and improved icon editor.

3) Discussion Forums
This is where you can chat with others about specific NI questions or problems. Often, this is a great way to get support as it is monitored by lots more people, many of whom are NI employees!

4) Example Code
Got a case of “Blank VI Syndrome”? head to the example code section to see if someone has written something similar. This is a great way to get started on a project or code module quickly and save development time. You can search for specific topics or browse by product, manufacturer, application area, Industry and more.

5) Tutorials
Learn about a wide variety of topics such as issues you may face when upgrading existing code to LV 2009 (http://decibel.ni.com/content/docs/DOC-6141), How to use VI scripting (http://decibel.ni.com/content/docs/DOC-4973), and even how to interface to your Wii with LabVIEW (http://decibel.ni.com/content/docs/DOC-1353)!

6) Groups
Join groups so you can get the latest info from engineers tackling similar problems to you.

Happy Learning,

Porting DAQmx Task Configurations

Ever wondered what's the best way to port DAQmx task and channel configurations from one PC to another with minimal fuss? It is a problem we are faced as intergrators every day - how do we make the application easy for our client to install and maintain well into the future? We always need to have some sort of hardware configuration in our applications, but is it best to:

a) store that configuration information as an extra file, or should it be

b) integrated into the software application to minimise the number of files required on each target PC, making the installation process quicker and simpler for the client?

I like the idea of option b, however it seems a lot more work and therefore cost to code the hardware configuration into LabVIEW, rather than simply exporting the Measurement and Automation Explorer (MAX) configuration file to the target machine.

Something I have been using for a long time, which seems to be a little known feature of LabVIEW, is automatic code generation for DAQmx tasks. This feature makes it a breeze to convert your MAX task configurations into code. Using this, you can easily deploy hardware configurations inside your executables, and it is simple to add or modify those configurations in LabVIEW later.

Here is the trick....

1) Create and configure your DAQmx task in MAX

2) In LabVIEW, place a DAQmx task name constant on your block diagram

3) Pull down on the task constant and select the saved MAX task (just as if you were going to use the saved MAX configuration to run the hardware I/O functionality)


4) Right-click the task constant and select "Generate Code".

Here you have a number of options, the most usefull of which are "Configuration" and "Configuration and Example". If you have blank VI the "Configuration and Example" option is gold, as it automatically generates your while loop, stop button, graph and all those other little VIs that I always forget to include when developing DAQmx code, such as start task and stop task. It also generates a subVI, inside of which you will find all of your task configuration code. once this subVI is built, you can forget about your MAX configuration files as all the configuration information is now in your code - brilliant!

If you have already written your data acquisition code, and simply need to generate your MAX configuration code, use the "Configuration" option. This will automagtically generate a neat little subVI with a task and error output.

Go on, give it a go!


Followers